This last year I took Ceramics I at KVCC. Since I had to keep all my projects in the lab until my critique on the final day, I haven't been able to post any pictures of the work I have done. I did show some pictures of the dragon sculpture in its raw clay form, but that doesn't count.
The first creation was a pinch form, a penguin teapot. I've obviously decided to not post it. Because.
The next project was a coil form. The outside form was a base of tenmoku, wiped down a little with a sponge, and I believe a layer of clear on top. The leaves should be celedon and another color. Tenmoku, in its raw glaze state, is a deep red color (due to the oxides). When I wiped away tenmoku glaze, the clay underneath was still dyed, and later created the copper tones. It looks really nice and I'm fond of the near turtle shell effect it has.

For the slab project, you take a giant hunk of clay and roll it through this huge set of rollers between two pieces of canvas. After letting the slabs air dry to leather hard consistency, you can cut out pieces and start fitting them together with wet clay and slip. This hexagon shaped box was a pain in the ass - I drew out a pattern before hand and modeled the carvings after traditional Jali screens (which are gorgeous, btw). I was pretty pissed when it came to the lid - when trying to figure out the measurement for the top lid and sides, I found I could actually use the algebra I learned. For art. The irony was almost palpable.
When taking the box to glaze, I fucked up. To keep the details of the lid and the sides, I was only going to do one coat of the celedon. However, I dipped the lid vertically, and the glaze pooled on the lid on the right. If given the chance to do so again, I would definitely use the airbrush. Also, in the kiln, the side warped inward. It still looks lovely - it was four whole days of work and carving, and its just a bummer to see it that way.
About a week after we started the slab, the class started utilizing the wheel. For all the skill and patience I have for carving and immaculate detail, I had a horrible time with the wheel. I went through nearly 13-15 different bowls, with only three making it to the kiln. And those weren't even the best bowls. On the left, that bowl is super wobbly (but makes a badass cereal bowl).
Others ended up as accidental plates, threw themselves off the wheel, or started cracking on the edges. Every day in the class, I went to Graphic Design with clay all over the place. The next bowl is pretty good and only a very slight dip. The blue slip looks a little odd, but it makes for a very nice dip dish. The thickness is spot on, though.
The last bowl is very small, but I have a fondness for it. I wish I would have used less glaze, since I lot of the detail I carved into the sides was covered up in the thick application. The spoudamane and celedon(?) looks very nice, and I'm not a huge fan of celedon.
Francis, my teacher, told us to make two small quickly rolled forms, dry them in the sun and get them to the greenware shelf as soon as possible. The pieces, to the left and below, use what's called the Raku process. When the piece is in bisqueware state, you use a special Raku glaze. There was a crackle white and a crackle green, but I used copper sand and copper luster. The one on the bottom is pure copper luster (and turned out a lovely silver and blue), while the one on the right has sand in the center, then a ring of copper luster, then a ring of sand again. It has a huge array of colors, but the application could have been thicker.
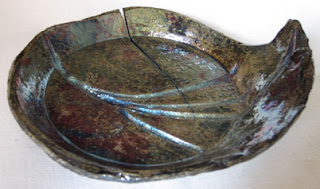
The next part is the best. You take the glazed pieces and put them in an outdoor kiln for about 15-20mins. After it hits about 1300 or so, you take the pieces red hot out of the kiln and throw it into a garbage can lined with sawdust or newspaper, then slam on a lid with wet towel as a seal. The newspaper goes up in flames as soon as the piece touches the bottom. You reek horribly when you leave, but it's fun as hell. I was going to take a Raku class this summer, but, KVCC canned the class. Assholes.
The last piece, my final project, turned out fucking awesome. I thought a glazed dragon might be difficult and look a touch awkward, so I used special underglazing paints. The teeth and eyes were glazed a white and red, respectively. The stonework looks really nice, but the dragon needed a little more work. The bummer is that I only had one work day to paint and clean up, so it was a bit of a rush job.
The final firing took it's toll on the poor thing though. There are severe cracks in the two pieces of the 'cliff', and the bottom one warped so far that the extended dragon leg holds the entire weight of the front of the statue. One chunk of a wing broke off, but not the most delicate one.
I'm extremely proud of this work, despite its many, many flaws (even if I accidentally hit it with my foot and broke off one of its ear-wing-things. Super glueeeee). There's a lot of warping, but then again the final fire is at 2300 degrees. I want to try doing more sculptural work, sticking to mostly additive sculpture. I bought some Sculpey Firm polymer clay to try subtractive sculpture, but that might be a disaster >.>;
Besides the Raku class that epically failed, I would like to take another ceramics class. Even if that means more time on that horrible wheel contraption. Otherwise, I just might to have to find an open workshop somewhere and get access to a kiln. Building my own is possible (lol), but certainly not realistic. Clay is a pretty cool medium to work with, and I only hope I have time to work with it again.
I love you dragon, don't stop being awesome ^.^


0 comments:
Post a Comment